topbanner_forum
  *

avatar image

Welcome, Guest. Please login or register.
Did you miss your activation email?

Login with username, password and session length
  • Thursday March 28, 2024, 2:15 pm
  • Proudly celebrating 15+ years online.
  • Donate now to become a lifetime supporting member of the site and get a non-expiring license key for all of our programs.
  • donate

Author Topic: Batch-edit images (remove frames)  (Read 10886 times)

n8wachT

  • Supporting Member
  • Joined in 2015
  • **
  • Posts: 54
    • View Profile
    • LinkList
    • Donate to Member
Batch-edit images (remove frames)
« on: November 26, 2015, 10:45 PM »
Howdy,

Please forgive me if this been asked before (site is so big!). I am looking for a batch-editor for images. Images that have borders/frames on one part of the picture (below/above) and/or pictures that got frames on all 4 sides. The option to cut out/remove that kind of stuff would be really helpfull- instead of removing them one by one. Want to edit an directory with 1000+ images this way so one by one isnt really an option. And I'm convinced there is a smart trick to do so somewhere on this site or amongst the members..  :D

I've added an example picture- imagine all the photo's in my directory have the same white border. Think you understand what I mean now  :)

demo.jpgBatch-edit images (remove frames)


Thank you!

Jibz

  • Developer
  • Joined in 2005
  • ***
  • Posts: 1,187
    • View Profile
    • Donate to Member
Re: Batch-edit images (remove frames)
« Reply #1 on: November 27, 2015, 01:49 AM »
If you are not afraid of command-line tools, it sounds like the kind of thing ImageMagick would be able to do. A quick google points to the trim command.

n8wachT

  • Supporting Member
  • Joined in 2015
  • **
  • Posts: 54
    • View Profile
    • LinkList
    • Donate to Member
Re: Batch-edit images (remove frames)
« Reply #2 on: November 29, 2015, 03:50 AM »
If you are not afraid of command-line tools...

No, actually.. I just started learning more about it and I must say..... It's really something that you get good at
by trying and doing it for a long time so.. Let's get this party started! And thnx for the tip! Imagemagick is indeed
the kind of tool i am looking for.

tomos

  • Charter Member
  • Joined in 2006
  • ***
  • Posts: 11,959
    • View Profile
    • Donate to Member
Re: Batch-edit images (remove frames)
« Reply #3 on: November 29, 2015, 12:58 PM »
I did this once with IrfanView but dont have it installed here so cannot check. I remember it being a little unintuitive -- at least I had to mess around a bit before I discovered how exactly to get X number of pixels off of the bottom of multiple images. I was removing the taskbar from screenshots, some of which had already been cropped (but the taskbar edge was not cropped so I always wanted to remove that 'X' number of pixels).

Are your images different sizes?
Are the frames/margins always the same width?
Tom

n8wachT

  • Supporting Member
  • Joined in 2015
  • **
  • Posts: 54
    • View Profile
    • LinkList
    • Donate to Member
Re: Batch-edit images (remove frames)
« Reply #4 on: November 29, 2015, 01:35 PM »
Are your images different sizes?
Are the frames/margins always the same width?
-tomos

Sadly there aren't a lot of constant factors. The only thing we can see as an certainty is that the white frame is always located at the bottom of the picture. But it can vary in width cause some pictures are in 'standing mode' while others ''lie down'' (not sure how to put that in english, hoping you still understand what  I mean).

And.. besides those differences the pictures are also in various sizes as an whole. So I already figured that wasnt the best outcome for an coding adventure... right?

tomos

  • Charter Member
  • Joined in 2006
  • ***
  • Posts: 11,959
    • View Profile
    • Donate to Member
Re: Batch-edit images (remove frames)
« Reply #5 on: November 29, 2015, 01:54 PM »
[..] some pictures are in 'standing mode' while others ''lie down'' (not sure how to put that in english, hoping you still understand what  I mean).

nice way of putting it (and very understandable) -- 'Portrait' and 'Landscape' would be the terms used
('Hoch' and 'quer' auf deutsch if that's any help).


Are your images different sizes?
Are the frames/margins always the same width?
-tomos

Sadly there aren't a lot of constant factors. The only thing we can see as an certainty is that the white frame is always located at the bottom of the picture. But it can vary in width cause some pictures are in 'standing mode' while others ''lie down'' (not sure how to put that in english, hoping you still understand what  I mean).

And.. besides those differences the pictures are also in various sizes as an whole. So I already figured that wasnt the best outcome for an coding adventure... right?

it might possibly be of help that the margins are all white -- but I wouldn't know as I dont know anything about coding myself...
But the IrfanView route would not work AFAIK if frame width varies a lot.
Tom

kunkel321

  • Supporting Member
  • Joined in 2009
  • **
  • Posts: 597
    • View Profile
    • Donate to Member
Re: Batch-edit images (remove frames)
« Reply #6 on: November 29, 2015, 02:58 PM »
I was also going to suggest IrfanView.  Also, RealWorld Icon Editor has some advanced batch capabilities. 


Edit:  Very cool AutoHotkey script down there!!!
« Last Edit: November 29, 2015, 03:15 PM by kunkel321 »

Lintalist

  • Participant
  • Joined in 2015
  • *
  • Posts: 120
    • View Profile
    • Lintalist
    • Donate to Member
Re: Batch-edit images (remove frames)
« Reply #7 on: November 29, 2015, 03:00 PM »
I don't know if you are familiar with AutoHotkey - http://autohotkey.com - but you can read and edit images using GDI+
Luckily there is a library for that which makes things a lot easier.
I'm not very familiar with it but this is a proof of concept, still flawed, but should get you going.

You need:
- AutoHotkey, you can download it at http://autohotkey.com - it is a familiar program to many Donationcoders.
- You also need the GDI+ library, you can get at the links in the script below
- I also had to add the missing crop function, luckily Learning One made one so I copied it below

The demo script below almost works. I'll explain what it does:

- It reads/opens the image
- It gets the dimensions of the image, we need to know its height
- Then it reads the color of the pixels starting at the bottom of the image, that is why we needed the height
- If the pixel is white, move one pixel up, get the color and so on
- Once we find the first non-white pixel: bingo we now know how many pixel to crop from the bottom
- Crop the number of pixels from the bottom
- Save it to a new image

At the moment it looks for pixels that are 100% white. As you will notice that isn't a 100% accurate because it will "stop" reading pixels at a nearly white pixel. So there are things that would need to be fixed: a) it is probably better to look for a black pixel - if there is always a black border that is, and b) also take into account some variations of the color values of the pixel just to be sure.

Once you've got it working for one image, it is just matter of wrapping it in a loop, run the script, grab some coffee and lean back :-)

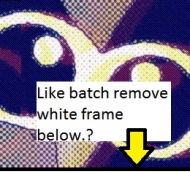
As you can see it stopped a bit to early as the pixel it found wasn't 100% white.
demo2.pngBatch-edit images (remove frames)

; get http://autohotkey.com
; https://www.dropbox.com/s/0e9gdfetbfa8v0o/Gdip_All.ahk if you have 64bit/unicode ahk
; or https://autohotkey.com/boards/viewtopic.php?t=6517 for others
; 4294967295 = 0xFFFFFFFF = white

pToken := Gdip_Startup()
pBitmap := Gdip_CreateBitmapFromFile("demo.jpg")

Gdip_GetImageDimensions(pBitmap,width,height)

Loop, % height
{
If (Gdip_GetPixel(pBitmap, 1, height-A_Index) <> 4294967295)
{
down:=A_Index
break
}
}
MsgBox % down

pBitmap2:=Gdip_CropBitmap(pBitmap, 0, 0, 0, down)
newfile:=A_ScriptDir "\demo2.png"
Gdip_SaveBitmapToFile(pBitmap2, newfile)
Gdip_Shutdown(pToken)
MsgBox Done

#include Gdip_All.ahk

; https://autohotkey.com/board/topic/29449-gdi-standard-library-145-by-tic/page-58
Gdip_CropBitmap(pBitmap, left, right, up, down, Dispose=1) { ; returns cropped bitmap. Specify how many pixels you want to crop (omit) from each side of bitmap rectangle. By Learning one.
Gdip_GetImageDimensions(pBitmap, origW, origH)
NewWidth := origW-left-right, NewHeight := origH-up-down
pBitmap2 := Gdip_CreateBitmap(NewWidth, NewHeight)
G2 := Gdip_GraphicsFromImage(pBitmap2), Gdip_SetSmoothingMode(G2, 4), Gdip_SetInterpolationMode(G2, 7)
Gdip_DrawImage(G2, pBitmap, 0, 0, NewWidth, NewHeight, left, up, NewWidth, NewHeight)
Gdip_DeleteGraphics(G2)
if Dispose
Gdip_DisposeImage(pBitmap)
return pBitmap2
}
/*
;Examples:
pCroppedBitmap := Gdip_CropBitmap(pBitmap, 10, 10, 10, 10) ; crops 10 pixels from each side of bitmap rectangle. Disposes of pBitmap.
pCroppedBitmap := Gdip_CropBitmap(pBitmap, 50, 50, 0, 0) ; crops 50 pixels from left and right side of bitmap rectangle. Disposes of pBitmap.
pCroppedBitmap := Gdip_CropBitmap(pBitmap, 0, 0, 77, 77, 0) ; crops 77 pixels from upper and lower side of bitmap rectangle. Does not dispose of pBitmap.
*/

esc::ExitApp
« Last Edit: December 04, 2015, 04:13 PM by Lintalist, Reason: edited for grammar/style »

Jibz

  • Developer
  • Joined in 2005
  • ***
  • Posts: 1,187
    • View Profile
    • Donate to Member
Re: Batch-edit images (remove frames)
« Reply #8 on: November 29, 2015, 05:06 PM »
Using mogrify from ImageMagick (overwrites original), removing borders that are within 3% of the corner colors:

mogrify -trim -fuzz 3% demo.png

demo.png

4wd

  • Supporting Member
  • Joined in 2006
  • **
  • Posts: 5,641
    • View Profile
    • Donate to Member
Re: Batch-edit images (remove frames)
« Reply #9 on: November 29, 2015, 05:42 PM »
XnView - Batch processing using Auto crop

2015-11-30 10_37_04.pngBatch-edit images (remove frames)

Before:
Before.jpgBatch-edit images (remove frames)

After:
After.jpgBatch-edit images (remove frames)

If you want to do it from the command line, you can use nconvert which is part of XnView, this is for a single folder:

Code: Text [Select]
  1. for /f "usebackq" %a in (`dir K:\ /b *.jpg`) do ("C:\Program Files (x86)\XnView\nconvert.exe" -autocrop 70 245 245 245 %a)

This will recurse a whole directory tree:

Code: Text [Select]
  1. for /r K:\ %a in (*.jpg) do ("C:\Program Files (x86)\XnView\nconvert.exe" -autocrop 70 245 245 245 %a)

nconvert is non-destructive by default, the original images will not be replaced, you'll end up with <name>_<number>.jpg in the same folder as the original.
« Last Edit: November 29, 2015, 06:14 PM by 4wd »

n8wachT

  • Supporting Member
  • Joined in 2015
  • **
  • Posts: 54
    • View Profile
    • LinkList
    • Donate to Member
Re: Batch-edit images (remove frames)
« Reply #10 on: December 03, 2015, 02:16 PM »
First of all, thanks- every buddy for thinking with me!

I don't know if you are familiar with AutoHotkey - http://autohotkey.com - but you can read and edit images using GDI+
Luckily there is a library for that which makes things a lot easier.
I'm not very familiar with it but this is a proof of concept, still flawed, but should get you going.

And that.... is briljant. Last week, I spend for a larger amount of time by getting lost. I mean, there is soooo much you can do as newbie.. Mindbl0wn by this and whoa look how cool is that without actually got to the ''creating something'' (maybe 281 new bookmarks unsorted added). Sensory overload YEAH thats what I ment!

But now, after that briljant Autokey-reply... I made that my allround starting point in coding. Just finished collecting all the tools needed, and got myself couple of ebooks for beginners. I can't tell you how happy I am already with the script cause I need to play level 1 till 7 first to fully understand how it works. And when I do... I'lll get  back here with the result (or failure  ;))