topbanner_forum
  *

avatar image

Welcome, Guest. Please login or register.
Did you miss your activation email?

Login with username, password and session length
  • Saturday January 18, 2025, 5:42 pm
  • Proudly celebrating 15+ years online.
  • Donate now to become a lifetime supporting member of the site and get a non-expiring license key for all of our programs.
  • donate

Author Topic: IDEA: Image Append - Batch  (Read 9187 times)

magician62

  • Supporting Member
  • Joined in 2011
  • **
  • Posts: 180
    • View Profile
    • Donate to Member
IDEA: Image Append - Batch
« on: June 02, 2014, 01:39 AM »
I have looked in the forums, seen a few ideas, and the one most promising, broken link!

I am in the process of photographing newspapers for the local museum, there are 150 years of them, and the sheet are about 28 inches high by 18 wide. To get a readable image, I have had to photograph in 2 passes so I get 14 x 18

I now need to stack the photographs Top over Bottom.

I do not need to stitch them, even though I have provided a reasonable overlap of text.

I just need one above the other, possibly with a separating line

There must be no scaling or re-compression as this may affect the image

It also needs to do this in batch, as I have 52 papers a year, each with lots of pages. The images have been placed in one folder per page, and in the folder both part have been renamed to put them in the correct order.

Anyone encountered something like this? Or is this a doable. I don't fancy joining 90000+ pages in the long term, as I would rather be getting on with the photographing, as time is against me and the papers, which can only deteriorate.

Why an I Magician62? Because Magician1 thru 61 were gone. :)

MilesAhead

  • Supporting Member
  • Joined in 2009
  • **
  • Posts: 7,736
    • View Profile
    • Donate to Member
Re: IDEA: Image Append - Batch
« Reply #1 on: June 02, 2014, 05:41 AM »
Others may chime in.  I'm not very experienced with graphical editing.  But it's my impression Gimp may be designed for graphics manipulation more than most.  Also it's free.  While persuing this thread it may also be fruitful to search and post here:
www.gimptalk.com

Windows port:
www.gimpshop.com/gimp/?gclid=CPyr59GC274CFcEDOgodbkcACw

« Last Edit: June 02, 2014, 05:51 AM by MilesAhead »

tomos

  • Charter Member
  • Joined in 2006
  • ***
  • Posts: 11,965
    • View Profile
    • Donate to Member
Re: IDEA: Image Append - Batch
« Reply #2 on: June 02, 2014, 07:41 AM »
I now need to stack the photographs Top over Bottom.

I do not need to stitch them, even though I have provided a reasonable overlap of text.

I just need one above the other, possibly with a separating line

There must be no scaling or re-compression as this may affect the image

Can you give an example there - it's not clear to me what exactly you want to do - is it to create a large image showing all the photos from one paper? If so, how many pages/images would that be?

Can you photograph in Tiff format? (I've never used it this way, but tiff format can be multi-page; also has the advantage of lossless compression and lossless save/re-save. You could also convert to two bit tiff ['lineart'=just b/w, no grey] to reduce filesize, but would lose quality going there.)


I have looked in the forums, seen a few ideas, and the one most promising, broken link!

=> which thread/app/link?
Tom

magician62

  • Supporting Member
  • Joined in 2011
  • **
  • Posts: 180
    • View Profile
    • Donate to Member
Re: IDEA: Image Append - Batch
« Reply #3 on: June 02, 2014, 08:30 AM »
Basically the current concept is two images, in JPG put on a canvas so one is above the other
Think newspaper folded in middle

In general all images are the same size

The way I can explain it is using the image widths a canvas would be created based on the greater, and height would be created by the sum of the image heights, plus a few pixels for a separation line. The top image (A) would be pasted relative to top left corner, whilst the bottom (B)) relative to bottom left corner

A
B

At a later time it may be useful to have an option for 4 quadrants.
AC
BD


The broken link was for PhotoSheet in this thread. https://www.donation....msg146615#msg146615

I did find the website later, though it doesn't do what is needed.

The main thing with this is automation of the joining process.

Why an I Magician62? Because Magician1 thru 61 were gone. :)

Ath

  • Supporting Member
  • Joined in 2006
  • **
  • Posts: 3,630
    • View Profile
    • Donate to Member
Re: IDEA: Image Append - Batch
« Reply #4 on: June 02, 2014, 10:29 AM »
I know that RealWorld Paint, by DC member Vlastmil, has batch/scripting options, (though I never used them), you could have a look at this free proggy  :up:

tomos

  • Charter Member
  • Joined in 2006
  • ***
  • Posts: 11,965
    • View Profile
    • Donate to Member
Re: IDEA: Image Append - Batch
« Reply #5 on: June 02, 2014, 02:56 PM »
Judging by this thread - GIMP script to batch split + rotate TIFF images,
ImageMagick might be your answer.
But you would need to ask at their forum I guess.

There is scripting for gimp as well e.g. http://gimpscripts.com/

(I dont have any experience with these myself.)
Tom

4wd

  • Supporting Member
  • Joined in 2006
  • **
  • Posts: 5,644
    • View Profile
    • Donate to Member
Re: IDEA: Image Append - Batch
« Reply #6 on: July 11, 2014, 10:31 AM »
Here's something that might make it easier: gmMontage

It's a simple program that will generate a batch script to be used with the GraphicsMagick program, (that means you need to install GraphicsMagick).

New v0.0.0.3:
Modified GUI
A few more colour choices for the separator
Generates the batch to call GM, just double-click it
Can generate Horizontal or Vertical GM batch file, so for the OP, run it first as Vertical, then run it as Horizontal on the resultant images from the Vertical run, and you'll get:

AC
BD
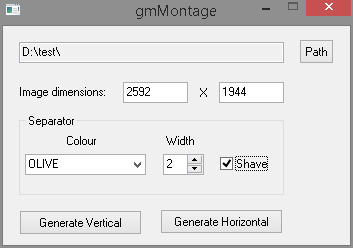

gmMontage1.png

Use the Path button to select an image in the folder you want to process, if Windows can read the image file the Width and Height values will be filled in along with the Path automatically.  You can enter the Width and Height manually if necessary, (eg. Windows can't read the info from the file) - any values you enter will be overwritten if you then choose another file.

Select a separator colour from the drop down list, (I can add more if necessary), set the separator width.  The Shave checkbox lets you remove the borders that get added at the top/bottom or left/right of the final image.

After it's finished you'll get the following window:

gmMontage2.png

NOTES:
1) It outputs a PNG file, the file will be named <image1>+<image2>.png.  Thus the output is lossless but will result in larger file sizes - you can always recompress as JPG to a level that's acceptable.
2) If there's an odd number of images in the folder, the last one won't be used.
3) This was written with the constraints of the OP in mind, ie. images are all the same dimensions, orientation, and vertical/horizontal appending of two images was required.

With any luck after executing the batch file you'll get the following result:

20140601-201827+20140601-201836.jpgIDEA: Image Append - Batch

Here's the source, executable attached:
Code: AutoIt [Select]
  1. #Region ;**** Directives created by AutoIt3Wrapper_GUI ****
  2. #AutoIt3Wrapper_Res_Fileversion=0.0.0.3
  3. #EndRegion ;**** Directives created by AutoIt3Wrapper_GUI ****
  4. #include <File.au3>
  5. #include <FileConstants.au3>
  6. #include <MsgBoxConstants.au3>
  7. #include <GDIPlus.au3>
  8. #include <ButtonConstants.au3>
  9. #include <ComboConstants.au3>
  10. #include <EditConstants.au3>
  11. #include <GUIConstantsEx.au3>
  12. #include <StaticConstants.au3>
  13. #include <WindowsConstants.au3>
  14.  
  15. _GUISetup()
  16. _Main()
  17. _Exit()
  18.  
  19.  
  20. Func _GUISetup()
  21.         #Region ### START Koda GUI section ### Form=d:\docs\autoit\_coding snacks\gmmontage\gmmontage.kxf
  22.         $Form1 = GUICreate("gmMontage", 347, 219, 335, 196)
  23.         Global $Input1 = GUICtrlCreateInput("", 16, 16, 265, 21, BitOR($GUI_SS_DEFAULT_INPUT, $ES_READONLY))
  24.         GUICtrlSetTip(-1, "Path to images to process")
  25.         Global $Button1 = GUICtrlCreateButton("Path", 296, 13, 35, 25)
  26.         GUICtrlSetTip(-1, "Select an image file in the folder to process")
  27.         Global $Input2 = GUICtrlCreateInput("", 120, 56, 65, 21, BitOR($GUI_SS_DEFAULT_INPUT, $ES_NUMBER))
  28.         GUICtrlSetTip(-1, "Width of the SOURCE images")
  29.         Global $Input3 = GUICtrlCreateInput("", 216, 56, 65, 21, BitOR($GUI_SS_DEFAULT_INPUT, $ES_NUMBER))
  30.         GUICtrlSetTip(-1, "Height of the SOURCE images")
  31.         GUICtrlCreateLabel("X", 197, 60, 11, 17)
  32.         Global $Button2 = GUICtrlCreateButton("Generate Vertical", 16, 184, 123, 25)
  33.         GUICtrlSetTip(-1, "Generate batch file for GraphicsMagick (Append Vertical)")
  34.         Global $Button3 = GUICtrlCreateButton("Generate Horizontal", 157, 183, 123, 25)
  35.         GUICtrlSetTip(-1, "Generate batch file for GraphicsMagick (Append Horizontal)")
  36.         GUICtrlCreateLabel("Image dimensions:", 16, 59, 91, 17)
  37.         GUICtrlSetTip(-1, "Dimensions of the SOURCE images")
  38.         $Group1 = GUICtrlCreateGroup("Separator", 16, 88, 265, 81)
  39.         Global $Combo1 = GUICtrlCreateCombo("BLACK", 22, 128, 121, 25, BitOR($CBS_DROPDOWN, $CBS_AUTOHSCROLL))
  40.         GUICtrlSetData(-1, "WHITE|YELLOW|GREEN|OLIVE|BLUE|DARKBLUE|GRAY42|ORANGE|RED")
  41.         GUICtrlSetTip(-1, "Colour of the separator line between images")
  42.         Global $Input4 = GUICtrlCreateInput("0", 160, 128, 41, 21, BitOR($GUI_SS_DEFAULT_INPUT, $ES_NUMBER))
  43.         GUICtrlSetTip(-1, "Pixel width of separator line," & @CRLF & "line will be DOUBLE this value." & @CRLF & "Max value: 20")
  44.         $Updown1 = GUICtrlCreateUpdown($Input4)
  45.         GUICtrlSetLimit(-1, 20, 0)
  46.         Global $Checkbox1 = GUICtrlCreateCheckbox("Shave", 217, 129, 52, 17)
  47.         GUICtrlSetTip(-1, "Shave added pixels from unused borders")
  48.         GUICtrlCreateLabel("Colour", 63, 108, 34, 17)
  49.         GUICtrlCreateLabel("Width", 163, 108, 32, 17)
  50.         GUICtrlCreateGroup("", -99, -99, 1, 1)
  51.         GUISetState(@SW_SHOW)
  52.         #EndRegion ### END Koda GUI section ###
  53. EndFunc   ;==>_GUISetup
  54.  
  55.  
  56. Func _Main()
  57.         While 1
  58.                 $nMsg = GUIGetMsg()
  59.                 Switch $nMsg
  60.                         Case $Button1
  61.                                 Local $sTemp = FileOpenDialog("gmMontage", "", "All (*.*)", $FD_FILEMUSTEXIST + $FD_PATHMUSTEXIST)
  62.                                 If @error > 0 Then ContinueLoop
  63.                                 Global $sSrce = StringLeft($sTemp, StringInStr($sTemp, "\", 0, -1))
  64.                                 GUICtrlSetData($Input1, $sSrce)
  65.                                 Local $sTempImage = $sSrce & StringMid($sTemp, StringInStr($sTemp, "\", 0, -1) + 1)
  66.                                 Global $sExt = StringMid($sTempImage, StringInStr($sTempImage, ".", 0, -1))
  67.                                 Global $iWidth = _GetDim($sTempImage, True)
  68.                                 Global $iHeight = _GetDim($sTempImage, False)
  69.                                 GUICtrlSetData($Input2, $iWidth)
  70.                                 GUICtrlSetData($Input3, $iHeight)
  71.                         Case $Button2, $Button3
  72.                                 Global $iWidth = GUICtrlRead($Input2)
  73.                                 Global $iHeight = GUICtrlRead($Input3)
  74.                                 If $iWidth = 0 Or $iHeight = 0 Or $sSrce = "" Then
  75.                                         MsgBox($MB_ICONERROR, "gmMontage", "Check PATH, WIDTH or HEIGHT values")
  76.                                         ContinueLoop
  77.                                 EndIf
  78.                                 If GUICtrlRead($Input4) > 20 Then GUICtrlSetData($Input4, "20")
  79.                                 If $nMsg = $Button3 Then
  80.                                         _GenBatch(True)
  81.                                 Else
  82.                                         _GenBatch(False)
  83.                                 EndIf
  84.                         Case $GUI_EVENT_CLOSE
  85.                                 Exit
  86.                 EndSwitch
  87.         WEnd
  88. EndFunc   ;==>_Main
  89.  
  90.  
  91. Func _GenBatch($bTemp)
  92.         Local $sGeometry = "1x2"
  93.         Local $sOutfile = $sSrce & "gmBatch-V.txt"
  94.         If $bTemp Then
  95.                 $sGeometry = "2x1"
  96.                 $sOutfile = "gmBatch-H.txt"
  97.         EndIf
  98.         Local $bShave = (GUICtrlRead($Checkbox1) = 1)
  99.         Local $iSep = GUICtrlRead($Input4)
  100.         Local $sColour = GUICtrlRead($Combo1)
  101.         Local $sTempFile = $sSrce & "gmMontage.txt"
  102.         Local $DOScmd = "dir /b /on *" & $sExt & " > " & $sTempFile
  103.         RunWait(@ComSpec & " /c " & $DOScmd, $sSrce, @SW_HIDE)
  104.         Local $aFiles = FileReadToArray($sTempFile)
  105.         If @error > 0 Or Not IsArray($aFiles) Then
  106.                 MsgBox($MB_ICONERROR, "gmMontage", "No " & StringUpper(StringMid($sExt, 2)) & "s found")
  107.                 Return
  108.         EndIf
  109.         FileDelete($sTempFile)
  110.  
  111.         Local $iCount = UBound($aFiles)
  112.         If Mod($iCount, 2) = 1 Then
  113.                 If MsgBox($MB_OKCANCEL + $MB_ICONWARNING, "gmMontage", "Odd number of " & StringUpper(StringMid($sExt, 2)) & "s found," & @CRLF & "skipping last image.") = $IDCANCEL Then Return
  114.                 $iCount -= 1
  115.         EndIf
  116.  
  117.         Local $hFile = FileOpen($sOutfile, $FO_OVERWRITE)
  118.         For $i = 0 To $iCount - 1 Step 2
  119.                 Local $sOutname = StringLeft($aFiles[$i], StringLen($aFiles[$i]) - 4) & "+" & StringLeft($aFiles[$i + 1], StringLen($aFiles[$i + 1]) - 4) & ".png"
  120.                 Local $sBatch = "montage -tile " & $sGeometry & " -background " & $sColour & " -geometry " & $iWidth & "x" & $iHeight
  121.                 If $bTemp Then
  122.                         $sBatch &= "+" & $iSep & "+0 " & $aFiles[$i] & " " & $aFiles[$i + 1]
  123.                 Else
  124.                         $sBatch &= "+0+" & $iSep & " " & $aFiles[$i] & " " & $aFiles[$i + 1]
  125.                 EndIf
  126.                 If $bShave And $iSep > 0 Then
  127.                         If $bTemp Then
  128.                                 $sBatch &= " temp.bmp" & @CRLF & "convert -shave " & $iSep & "x0 temp.bmp " & $sOutname
  129.                         Else
  130.                                 $sBatch &= " temp.bmp" & @CRLF & "convert -shave 0x" & $iSep & " temp.bmp " & $sOutname
  131.                         EndIf
  132.                 Else
  133.                         $sBatch &= " " & $sOutname
  134.                 EndIf
  135.                 FileWriteLine($hFile, $sBatch)
  136.         Next
  137.         FileClose($hFile)
  138.         $hFile = FileOpen($sSrce & "gmMontage.cmd", $FO_OVERWRITE)
  139.         FileWriteLine($hFile, StringLeft($sSrce, 2) & @CRLF & "cd " & StringMid($sSrce, 3) & @CRLF & _
  140.                         "gm batch -echo on -feedback on " & $sOutfile & @CRLF & _
  141.                         "del temp.bmp")
  142.         FileClose($hFile)
  143.         MsgBox($MB_OK + $MB_ICONINFORMATION, "gmMontage", "GraphicsMagick batch file created." & @CRLF & @CRLF & _
  144.                         "Double-click on the file 'gmMontage.cmd' in the image folder.")
  145. EndFunc   ;==>_GenBatch
  146.  
  147.  
  148. Func _GetDim($sTemp, $i = True)
  149.         _GDIPlus_Startup()
  150.         Local $hImage = _GDIPlus_ImageLoadFromFile($sTemp)
  151.         If $i Then
  152.                 Return _GDIPlus_ImageGetWidth($hImage)
  153.         Else
  154.                 Return _GDIPlus_ImageGetHeight($hImage)
  155.         EndIf
  156.         _GDIPlus_ImageDispose($hImage)
  157.         _GDIPlus_Shutdown()
  158. EndFunc   ;==>_GetDim
  159.  
  160.  
  161. Func _Exit()
  162.         Exit
  163. EndFunc   ;==>_Exit
« Last Edit: July 12, 2014, 08:42 AM by 4wd, Reason: New version »

4wd

  • Supporting Member
  • Joined in 2006
  • **
  • Posts: 5,644
    • View Profile
    • Donate to Member
Re: IDEA: Image Append - Batch
« Reply #7 on: July 11, 2014, 04:34 PM »

4wd

  • Supporting Member
  • Joined in 2006
  • **
  • Posts: 5,644
    • View Profile
    • Donate to Member
Re: IDEA: Image Append - Batch
« Reply #8 on: July 12, 2014, 08:43 AM »

mouser

  • First Author
  • Administrator
  • Joined in 2005
  • *****
  • Posts: 40,922
    • View Profile
    • Mouser's Software Zone on DonationCoder.com
    • Read more about this member.
    • Donate to Member
Re: IDEA: Image Append - Batch
« Reply #9 on: July 12, 2014, 08:45 AM »
Nice  :up:

4wd

  • Supporting Member
  • Joined in 2006
  • **
  • Posts: 5,644
    • View Profile
    • Donate to Member
Re: IDEA: Image Append - Batch
« Reply #10 on: July 12, 2014, 10:37 AM »
Thanks!

Although I missed the part where the images are in pairs in sub-dirs that are named according to page.

I think I would have gone with a folder/issue with images named Page01a.jpg, Page01b.jpg, etc - would be easy to see where a snafu occurred in appending then, (eg. Page01a + Page02b.jpg =  :huh: ).