| Application Name | Zever2TFT |
| Version | 0.9 |
| Short Description | Display Zevercloud solar day-production on a TFT or eInk display |
| Supported OSes | Script: Any OS Supporting Python 3.x, ESPEasy (TFT/eInk/IoT) |
| Web Page | This page (for now) |
| Download Link | (Soon to be) Attached |
| System Requirements | - OS Supporting Python 3.x (Windows, Linux/Raspberry Pi, Mac, ...)
- Additional Python modules: pytz, requests
- ESP8266 or ESP32 IoT controller unit (Wemos D1, NodeMCU, ESP32 DevkitC, etc.)
- TFT Display: ILI9341 based tft display (SPI connected)
- eInk display: IL3897 based e-paper display (SPI connected)
- Some wires and light soldering skills to connect stuff together
- (Hardware can be obtained from your local supplier, eBay, Aliexpress, Banggood, etc.)
- ESPEasy software from https://github.com/letscontrolit/ESPEasy
- A PC (Windows/Linux/Mac) with USB port to flash the firmware onto the ESP controller (I'm using Windows)
|
| Version History | - v0.9.0: Dec. 2020: Rework to use changed Zevercloud API
 - v0.1.0: Aug. 2020: Initial version
|
| Author | Link to Author's Profile page |
DescriptionHaving installed a solar systems a few years back, using a ZeverSolar inverter and connected to Zevercloud for easy overview of generated power, and an interest in IoT, I found ESPEasy, and the rather affordable ESP controllers, I thought it would be nice to combine these.
The availability of very affordable TFT display (I bought a 4.3", 65k colors unit), and the requirement for the Zevercloud web interface to re-login every 30 minutes or so to be able to view the current production graph, I searched for, and found, an API to retrieve the graph data in json format.
Now to turn that data into a nice graph... enter: Python

I've only sniffed a little at python a few years back, but never actually done anything serious with that, so I took this as an
challenge opportunity to learn a few things:
- Python programming
- Turning a bunch of data into a graph
Hence this script was crafted

NB: Some assembly required! And command-line skills required! (that should fit with the average audience here


)
FeaturesFetch data from the Zevercloud API
Present that on a TFT (or ePaper) display, connected to an ESP controller
Scale the graph, based on the max available value, so the display is nicely filled
Planned FeaturesFix the login issue with the revamped API (No thanks, Zevercloud

)
Support other Solar power aggregation platforms
Any interesting features I, or other potential users, might think of
A, probably 3D printed, housing for the device
Screenshots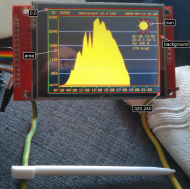 NANY 2021: Zever2TFT - Display solar production on TFT or eInk display (IoT)
Result of a nice day of solar production
UsageInstallation: HardwareSee next post
Installation: Script- Install Python 3
- Install required python modules: pip install pytz requests
- Unpack the script and run it once, this will fail, but create an initial settings file: zever2tft.json
- Retrieve the API key, APP Key and APP Secret values (more details are in the script documentation)
- Add the values to the settings file, and set up other, display related, settings like size etc. (more details in the script documentation)
- Run the script, and it should draw the graph of today, or provide a yyyy-mm-dd date as first argument for displaying the graph for that day
- When all settings are filled, a second run of the script will only update the extra data, not yet sent to the display, unless the scale has to be adjusted
Using the ApplicationRun the script on a regular basis, f.e. using a scheduler, like cron on Linux (Raspberry Pi?) or Task Scheduler on Windows.
UninstallationStop the scheduler if set
Remove the script
Option ally remove the Python install if no longer needed
TipsSet the scheduler to run every 5 minutes for a regular update
Setup a display timeout and add a button to wake the display, to extend the display's life expectation
As ESPEasy now also supports the XPT2046 touchscreen, mounted on the TFT unit, this can be configured to wake the display on touch (example to be added here)
Best to get an ESP controller unit that supports micro-usb for power supply and has 4 MB of flash memory, so a) it's easy to connect, and b) ESPEasy can be updated OTA (over the air) from it's web interface
Known IssuesUnfortunately, because of the recently changed API url and lacking any documentation, the login for the new API is not fully tested yet, as the new APP key and APP Secret are yet undefined how to fill (to be resolved asap)
Download will be attached ASAP!

