Continuing on with Edvard's thread since it's related, (hope you don't mind Edvard), we'll use a different method of getting the same effect.
I've done this using my router which is running
Tomato by shibby but it should be the same also, (with interface differences), for the DD-WRT family, basically as per Edvard said in his OP.
We're going to install
Almazick' AdBlock which also has a Web based GUI, you can get it at GitHub if you want to do it manually yourself.
NOTE: I have downloaded the zip file from the above site and are hosting it on one of my VPSs for two reasons:
- The wget command on the router can not handle HTTPS URLs, so it can't get the file from GitHub.
- I have rezipped the file to remove the folder structure, it's not needed and it makes the process simpler.
If you don't trust me feel free to download the original from GitHub and either use it or compare it with the one I'm hosting - don't worry, I'm incapable of being offended
 NOTE:
NOTE: By default, the IP for the pixelserver that gets run is x.x.x.254, ie. if your router is 192.168.1.1, then the pixelserver will be 192.168.1.254 If this is a problem for anyone, let me know and I'll edit the config file in the archive to change it to something more obscure
or you can change it after it's installed, (see further down at the web interface).
I've tried to make this as painless as possible by not having to use any form of SSH/ftp or anything other than the web interface of your router.
Before we start, refer back to Edvard's post and enable JFFS on your router, there's no need to reboot.1) Log in to your routers web interface and go to, (under Tomato),
Tools->
System Commands.
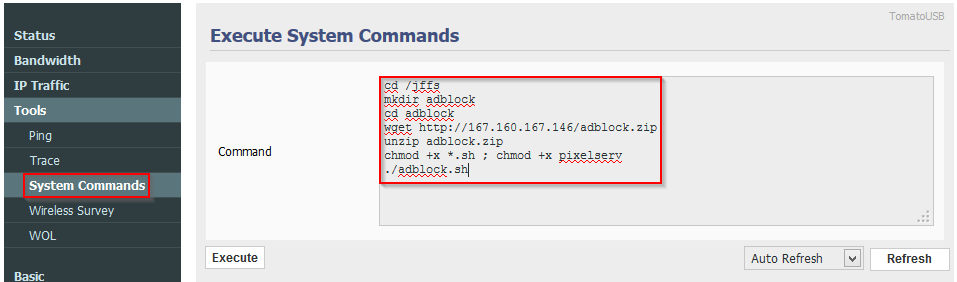
2) Paste the following lines into the
Command text field.
cd /jffs
mkdir adblock
cd adblock
wget http://167.160.167.146/adblock.zip
unzip adblock.zip
chmod +x *.sh ; chmod +x pixelserv
./adblock.sh
You should have something like this on the screen:
 3)
3) Press the
Execute button.
It will take anywhere from a few seconds to a minute or so, depends on your connection speed and how fast your routers CPU is.
At the end of that time the output from the commands should appear, like so:
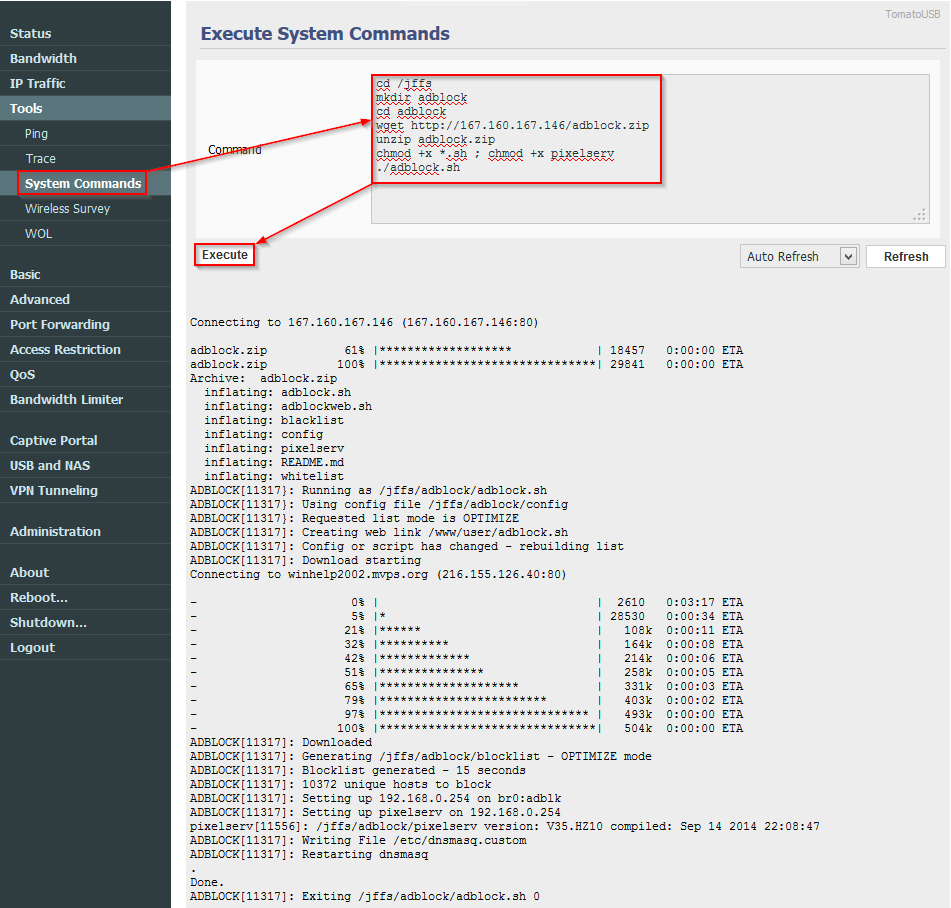 Congratulations!
 It's installed and running ... pretty painless.
What happened:- Change to the /jffs directory
- Create the adblock directory and change to it.
- Fetch the adblock.zip archive
- Unzip it.
- Set the executable attribute on the *.sh and pixelserver files.
- Execute the adblock.sh script which:
- Reads its config file.
- Creates a symbolic link so you can access the web interface, (more later).
- Downloads the hosts file from the mvps.org site (see here).
- Generates the blocklist to be used by dnsmasq.
- Starts the pixelserver (this is a minimal webserver that just serves a single pixel).
- Write dnsmasq.custom which is a config file for dnsmasq that tells it to call the blocklist (which is written as a dnsmasq config file - convoluted isn't it?).
- Finally restarts dnsmasq so it can use the new config files.
- adblock.sh then exits as it's no longer needed, all the work is done by dnsmasq from this point.
The Web InterfaceNow that adblock.sh has been installed and has run at least once, you should be able to access the web interface from where you can control it.
There is a caveat:- It seems you can't only use HTTPS to access your routers interface. You need to use HTTP or HTTPS & HTTP.
This screwed me up to start with as I always use only HTTPS, if you don't mind losing the web interface I'll show you how to control adblock.sh using your routers facilities later.
You can access the adblock web interface by going to:
http://<router IP>:<port>/user/adblock.sh (there's no need for a port number if your routers default interface port is 80)
You should end up with this:
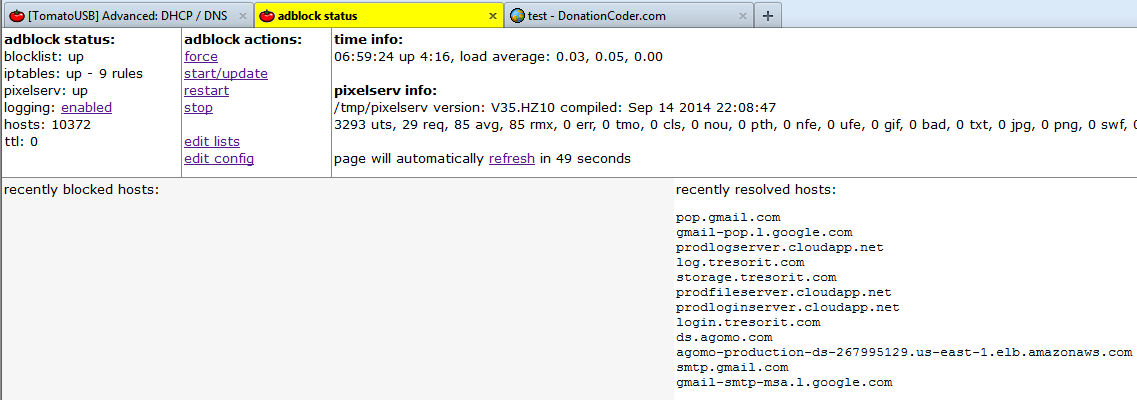
If it says
logging: DISABLED just click on DISABLED and it will start displaying output in the section below, refreshing every 120 seconds.
The
adblock actions are as follows:
- force - forces an update download of the hosts file, normally it won't do an update if it's too soon after the last one.
- start/update - starts adblock.sh or causes an update download if it's running. You will be told if the update didn't happen because it was too soon after the last.
- restart - self-explanatory
- stop - self-explanatory
- edit lists - allows you to edit/save the BLACKLIST and WHITELIST, these are not the same as the BLOCKLIST. The BLOCKLIST is generated by adblock.sh from downloaded hosts lists and contains dnsmasq commands. The BLACKLIST/WHITELIST are just a list of domains that you always want to block or allow.
- edit config - edit the adblock.sh config file. Unless you know what you're doing there's only one value in there you would need to change, and that's the value that concerns the IP of the pixelserver. By default the last octet of the IP the pixelserver uses is 254, eg. if your router is 192.168.1.32 then the pixelserver IP will be 192.168.1.254 - if this happens to clash with another computer/etc, then you can change it here, save, and restart the adblock.sh script.
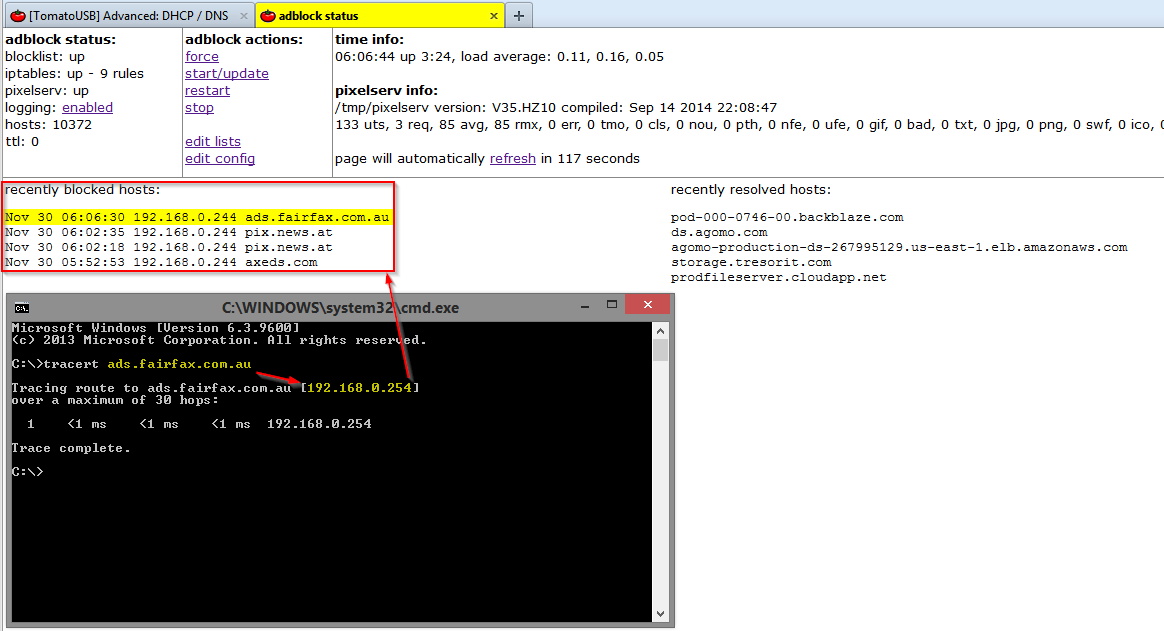
The big test:Open a CLI and type
tracert ads.fairfax.com.au, as in the image below, you should see the domain be resolved to the IP of pixelserver and after a refresh the web interface will show that the host has been blocked.
If you don't see any logging info, go to
Advanced->
DHCP/DNS and enter
log-queries into the
Dnsmasq Custom Configuration box, then hit the
Save button.
 Surviving a router reboot:
At this point in time, adblock.sh won't survive router reboots, ie. when the router starts next time, adblock.sh will need to be run again - until that time, there is no adblocking nor is there a web interface from which to start it.
So, what do we do?
We use Scripts:
In your router interface, go to
Administration->
Scripts and click the
WAN Up tab, enter
/jffs/adblock/adblock.sh in the text area and hit the
Save button down the bottom:
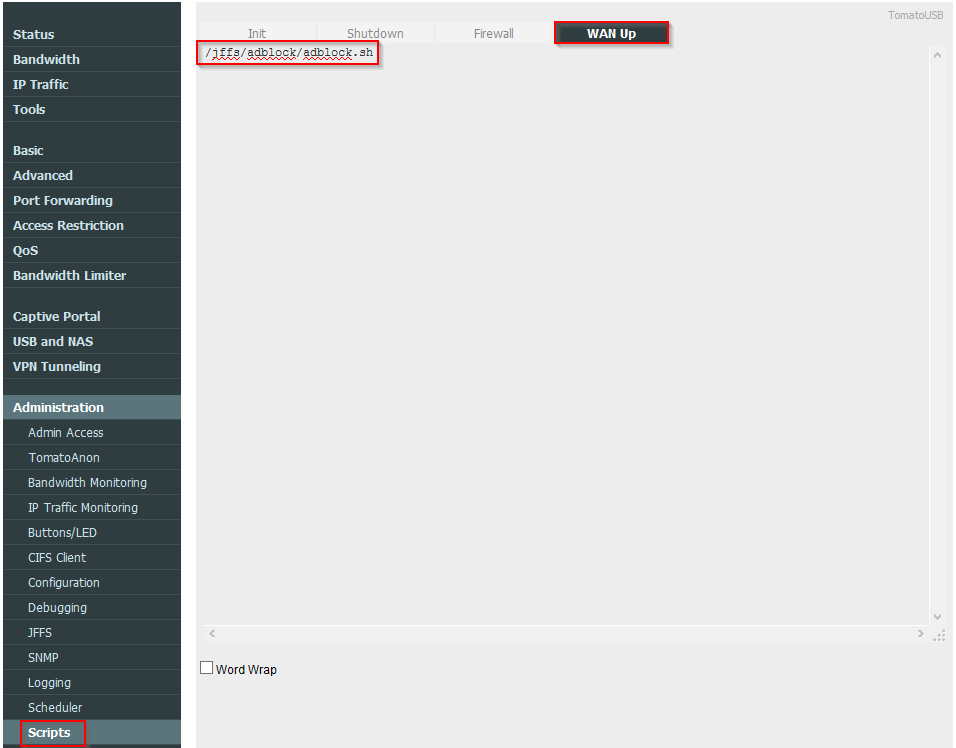
Now when your router establishes a connection to the WAN, adblock.sh will run and set itself up again.
Automatic updates:Rather than have to manually update the BLOCKLIST via the adblock web interface, let's do it automatically.
Head to
Administration->
Scheduler, enable one of the Custom schedules and fill it out as below, set a convenient time for the update to occur (once a week is more than enough):
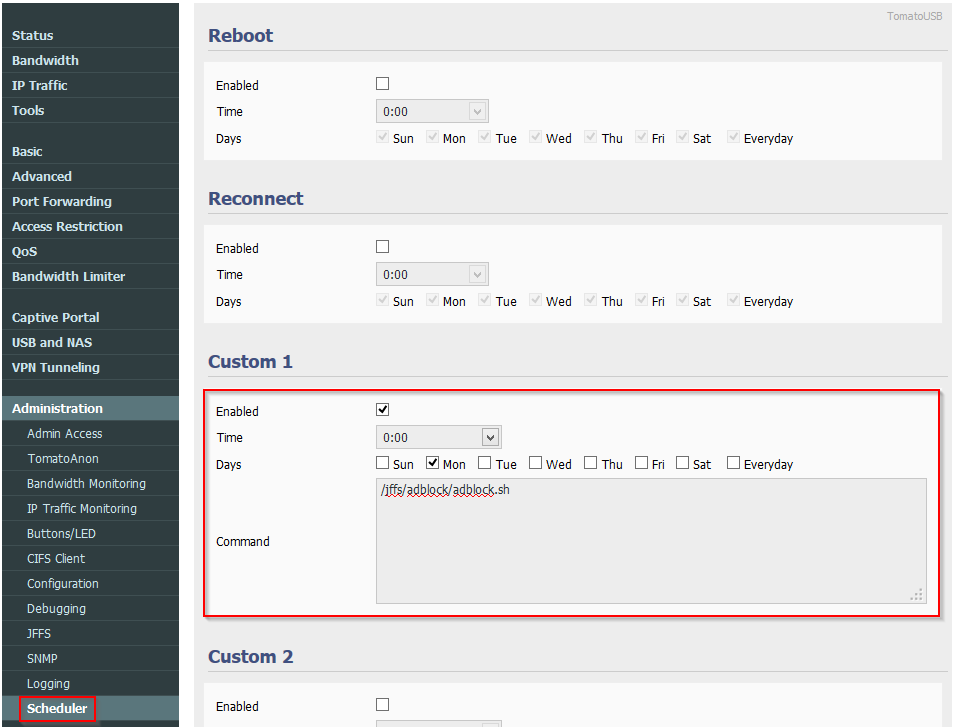
Remember to hit the
Save button after making any changes.
Toggling adblock On/Off:You want to allow ad servers for some reason, (you need your head read), you could fire up the web interface or you could use one more nifty feature of your router.
Administration->
Buttons/LED allows you to set the function of the WPS button depending on how long it's held down. You might already be using it for something so treat this as an example:
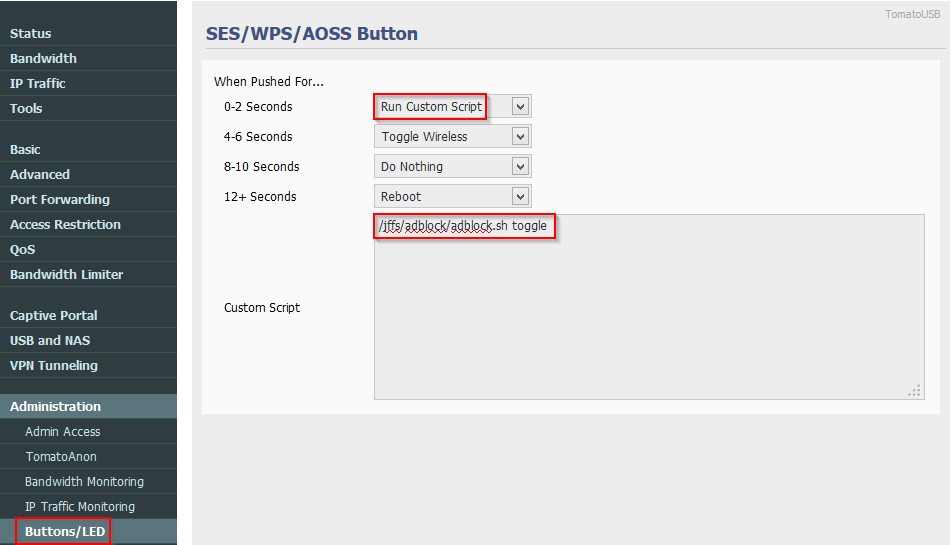
Remember to hit the
Save button after making any changes.
If you used the same settings as I did in the image, when you press the WPS button for less than 2 seconds it will toggle the state of adblock.sh - if it's On it goes Off and vice versa. You'll see its status change to
down or
up in the web interface depending on it's condition.
Now any connection to an ad server will go through, press the button again and they're blocked. Just a small note, it sometimes takes a couple of button presses to get adblock.sh to toggle, maybe my button is dodgy ... who knows ... I don't turn it off anyway.
That about wraps it up.
A couple of things that may be of interest:
- If you want to use an updated version of the pixelserver, change adblock.zip to adblock_HZ11.zip in the wget and unzip lines in step 2 - it came from here if you want to check it out.
- In the adblock_HZ11.zip archive there is a file called README_pix.md which explains what all the three-letter-acronyms in the pixelserver status display are.
- The config file, (/jffs/adblock/config), is well commented and easily understood.
- If you want to enable some of the other hosts lists in the configuration I suggest you download the files first and see how big they are, one of them is quite large and you may not have the capacity in your router to handle it.
For interest, these are the hosts lists that are already in adblock.sh config, only the first one is enabled by default:
I recommend that you
do not enable the second last one because at approx. 30MB I doubt whether you'd have enough space in your router to handle it.


 Recent Posts
 )
)

