"Scanning: VueScan and Associates - Part I"
"I have always had an interest in scanning. It began because I was traveling constantly and wanted to have as much documentation on my laptop with me as possible. My first attempts at document scanning were a fax machine which I rigged to be a direct input document scanner (without a telephone line) to my computer via the modem. This was before the flatbed scanners market took off. Then I bought my first real flatbed scanner in 1996 - an Epson ES-1000C with 400x800dpi resolution- giving me an entree into the world of color scanning. However, don't even think color scanning was such an effortless process then as it is now: just putting a color picture on the platen, press a button, and get a somehow decent result. In those days it took a whole afternoon of fiddling with scanner settings to get one somehow acceptable middle of the road color scan! The next year I got my feet wet with the first third party scanning application Art-Scan and I also bought a new faster SCSI flatbed scanner with 600x1200dpi resolution. And needless to say I was hooked ever since.
Since scanning became a minor hobby, I followed the development of VueScan for about 10 years -- occasionally (every couple of years) downloading the trial. This application has now reached a degree of maturity that I decided to do a deeper review for the DonationCoder community. Since VueScan in its expert mode can be quite daunting, some tutorial elements and walk throughs are included so that the reader can feel more at home even with some of the more obscure settings and get a very rich scanning experience out of VueScan. The more I worked on it the more I felt that the review should become even more holistic by also discussing selected software (like scanner utilities, e-book post processing, and sharpening) and hardware (color calibration targets and monitor calibration devices) that I found over the years which really help a lot to produce great scans in the most effortless way. Then my review grew bigger and bigger - as is the nature of life - until I finally decided to split it in several parts, the first installment you will get to enjoy now." --BrahmanPart I of the review tutorial deals with an introduction to
VueScan, its features, document- and book scanning.
Part II to be published soon will discuss VueScan's color management,
profiling, and raw scanning abilities plus more hints and tips and
more great software that complements VueScan.
BASIC INFO| App Name | Ed Hamrick's VueScan together with Wolf Faust's IT8.7 Scanner Calibration Targets and other associated applications like FocalBlade |
| URL | http://hamrick.com - http://www.targets.coloraid.de/ - http://www.ThePluginSite.com |
| Version Reviewed | VueScan 8.6, Faust's IT8 Calibration Set S1, FocalBlade 2.0 |
| Test System Specs | Windows XP SP3 on Desktop/Notebooks with the following scanners: Canon Lide 35/50, Plustek OpticFilm 7500i, Medion 90093 (OEM built by Microtek), Plustek OpticBook 3600, CanoScan 9000F |
| Supported OSes | VueScan: Windows 95-Windows 7, Mac 10.3-10.6, Linux binaries for Ubuntu 8.1 and Red Hat 9; FocalBlade2: 8bf plugin for many graphics applications (IrfanView, XNView, PhotoShop, PS Elements) on Windows, Mac to follow soon (v.1 still available with upgrade protection) |
| Support Methods | VueScan: E-mail support only; Faust: E-mail; FocalBlade: Forum |
| Upgrade Policy | VueScan Standard Edition: 12 months free upgrades, Professional Edition: free lifetime upgrades; FocalBlade: free upgrades for minor versions |
| Trial Version | VueScan: Standard Version with limited functionality available as trial with following restrictions: frequent nag screens and saved scans show $ signs; FocalBlade: Demo Version |
| Pricing Scheme | VueScan*: Professional $79.95, Standard $39.95, Upgrade from Standard to Pro $40.00, 10/100-user $200/$1000 (standard) and $400/$2000 (pro) respectively;
Wolf Faust's IT8.7 Scanner Calibration Targets starting at US$10.00+S&H;
FocalBlade 2 Win $69.95 ($49.95 Mac v.1 w. $20.- upgrade to upcoming version 2) |
| Acknowledgements | Ed Hamrick, Harry Heim, and Wolf Faust kindly provided their software and calibration targets plus graciously made themselves available for help with my questions |
* Please note: Ed Hamrick's web shop is technically not set up to give discounts therefore he regrets not to be able to extend a discount to the DC community. But the review author feels that the value for the program is tremendous even without a discount.
INTRODUCTIONVueScan -- programmed, maintained, devised, supported and sold directly by the developer Ed Hamrick -- is a well known scanning application. It provides the underlying intelligence that connects your scanner, monitor, printer and PC. In later parts of this review we will also discuss VueScan's use of Wolf Faust's IT8.7 Scanner Calibration Targets in automatically correcting color scans and further processing of your scans with complementary software like the popular sharpening software FocalBlade developed by German plug-in meister Harry Heim.
VueScan unlocks many features supported by your scanner which you may not even know that they are there. Let's name a few:
- multi-exposures for using your scanners maximum D-max range and adding detail in dark areas,
- multi-sampling for reducing picture noise
- pro version: scanning to and post-processing of raw files created by the software itself or from your camera,
- scan only once technology - no more prescan+scan+rescan - just one raw file to memory and then you can process and save your scan to disk with one click in many formats without rescanning
- excellent dust and scratch cleaning algorithm if your scanner has an infrared channel,
- pro version: calibration of your scanner and printer (IT8 target needed - f.e. Wolf Faust's sets at http://www.targets.coloraid.de),
- OCR to text/rtf file and/or searchable PDFs in 33 languages including Chinese,
- batch scanning and continuous or timed interval scanning without user intervention
- auto- and manual deskew
- automatic crop and multi crop
- easy and accurate scanning of negative film with a gazillion presets for different film types, even subdivided into different film-type generations
- easy custom profiling of negative film
- sophisticated file naming options
- pro version: custom color space profiles and embedding the profile into the saved file
- detailed control over every step of the scanning procedure
- option for showing pixel coloring of clipped black/white, out of gamut and infrared defects
- custom focus and exposure settings (if supported by your scanner),
- a wide range of automatic or manual color balancing and white point settings including many pre-profiled for different lighting environments
- works with all in one (AIO) devices and automatic document feeders (see list of supported devices)
VueScan can also breathe new life into scanners that are no longer supported on a new operating system release, because the original manufacturer has terminated driver development (e.g. Nikon for their line of excellent slide scanners in use by most professional scan shops all over the world but not manufactured any longer).
HISTORYVueScan has come a long way since version 0.1 appeared in 1998 supporting just one scanner on Windows at that time. Today it is published in 36 different languages and supports 1600+ scanners on versions of Windows 95+ (any scanner with a WIA - Windows Imaging - driver should work though you would lose some features like transparency adapters which WIA does not support; many scanners can be installed without manufacturer's drivers by using the enclosed scanners.inf file), 1100+ scanners on Mac OS X 10.3+ (any scanner with an Image Capture driver should work), and 700+ scanners on Linux. It is constantly being refined and polished by Ed Hamrick, sometimes releasing new minor versions three or four times a week adding features or support for new scanners. For example VueScan was able to work with the CanoScan 9000F as of May 29th, 2010 -- several weeks before this important new scanner model was available for purchase. Ed is an honour graduate of CalTech in Engineering and Applied Science who worked as a programmer at NASA and later Boeing before venturing out on his own.
REVIEW SETUPTo give the program a decent workout the initial testing setup was comprised of four scanners: A Plustek OpticBook 3600 book-scanner, a Plustek OpticFilm 7500i slide- and film-scanner, a Canon Lide 50 document and photo scanner (using the more recent Lide 35 driver since the built-in scanning hardware is identical), and the flatbed Medion 90093 with transparency adapter for film and slides which identifies itself via its driver as a Microtek Scanmaker 4800H48U in disguise. The scanners were attached to my dual core PC and my single core notebooks via USB 2.0 under Windows XP SP3.
 The VueScan (shown on monitor) scanner testbed setup: OpticBook, OpticFilm, Lide 50/35, and Medion 90093 (left to right)
The OpticFilm was only a loaner and on the Medion the transparency adapter unfortunately did not work since the scanner is not directly supported by VueScan so only basic scanning was possible. Therefore I really did not feel satisfied with the testing I was able to do and thus felt compelled to order the latest
Canon Scanner, the
CanoScan 9000F for this review.
 CanoScan 9000F specially flown in for this DonationCoder review
And I must say I got some quite surprising results, but please read on ...
GETTING ACQUAINTEDVueScan is only one 6.5 MB file to download which triples as trial, standard, and professional version installer depending on the serial number (or lack of it).
Installation under Windows is completely painless and sweet. The program uses under 15 MB of space and is semi-portable using ini files for its settings and keeping all program libraries in one folder. Merely the registration information is stored in the registry. The program is translated into 43 languages. The included Tesseract prerelease v.3.0 OCR engine has built-in support for English and can recognize 32 more languages by using dictionary files which are a separate free download.
The VueScan interface has three different modes:
- guided wizard mode (called "Guide Me" by Hamrick)
- advanced interface (invoked when leaving "Guide Me" by pressing "Advanced" button) and
- expert mode (kicks in when pressing "More" button)
Of course most self-esteeming DonationCoder members will immediately go into expert mode. So did I ... and messed up the settings really good

.
Therefore please heed my advice:
Full control of scanning (given to you in expert mode) is like flying the world's most advanced airliner - the Airbus A380 - on full manual. There are a zillion different factors which you can and need to adjust before you will receive a great scan. But if you don't exactly know what you are doing, you will crash the scan, though thankfully without any lives at risk except your own mental health.
Even an expert computer user should make use of the wizard mode for the first few scans to get a feel of the workflow and the options available. Ed has very wisely provided this mode for the new user: it is like scanning on autopilot, you will get to the destination with least effort.
 VueScan Professional Edition's attractive interface in wizard mode (This screenshot has been sharpened with FocalBlade - reviewed in another part of this series)
Do NOT play with the advanced/expert options first, because they will -- unseen to you -- influence the wizard mode: Options are not automatically reset to default when you enter "Guide Me". Thus if you mess something up in expert mode it might carry over into wizard mode, even when restarting the program. The way around that is to rename the vuescan.ini file and start the program afresh (or use File>Default Options).
After you have explored the different possibilities in wizard mode and gained some confidence in the program's ability to deliver great scans in an easy and effortless way click on "Advanced" and explore those possibilities. The "Advanced" mode gives the most important options, and if you click on Image>Graph b/w (or press Ctrl-2) you will also be able to use the histogram to set the black and white points.
VueScan's workflow is in its tabs, the menus have more of a subordinate function. The tabs are ordered in a very logical way: You work from leftmost (Input) going right (you may omit the Color tab) to Output to determine the parameters for your scan, then press Preview or Scan, if necessary set the black and white point by using the graph and then go to Color to refine the Scan even more if so desired. Actually you can press Preview anytime. VueScan holds the raw scan in memory but displays all changes you make in the preview window. But all those changes can be undone by resetting the values, since the original raw scan always remains in memory. So it is good to get in the habit of working the tabs from left to right because that is the natural workflow.
Once you find the settings to your liking, save the settings with File>Save Options so that you can use them next time a similar task comes up. VueScan is capable of saving settings to different unlimited profiles. I save to profiles frequently the same way I occasionally backup this text, so that I always have a known working backup of my settings.
Unfortunately VueScan cannot start up with a certain profile in the command line which would be a great boon for automating repetitive tasks.
When you click More in Advanced Mode, the program will give you full control over your scanning process. The interface will change to a very utilitarian design without any eye candy giving you long lists of dynamically changing options. The Prefs tab in particular is very long. If Ed could add a separate GUI tab to the interface and move all GUI related options to it, the Prefs tab would be much more ergonomic and less overwhelming. Sliders and spin buttons can be optionally used in addition to entering numeric values for many parameters. There is a bug in the GUI: When you set "Option panel width" setting to well below 300 and then just increase it by one unit, the options pane will be resized much more than just one unit. Also sometimes the options will slide down a bit leaving empty space in the upper part.
The bottom part of the interface consists of a status line which contains a brief workflow hint, the selected scanner and frame number, and a process progress display which will change upon scan completion to Output size in pixels, dpi, and mm as well as projected file size - all of these very useful data to have at your fingertips. So that all the scanning details are better visible even in a resized window, I would suggest to make "Input: Selected Scanner Name" in the bottom info line narrower and "Output: Scan Detail" wider or simply exchange them. A percentage of zoom indicator with a shortcut to jump to 100% for the image would be a useful addition here, because it is sometimes important in making adjustments to see at which zoom level one is inspecting an image.
VueScan uses the following mouse shortcuts. Since they are not documented in one central location let's list them here:
- inspect before/after latest changes by left clicking on the image while keeping Alt key pressed
- set white balance by right clicking on a neutral color within the image
- restore the default color balance (=white balance setting) by right double-clicking on the image
- reset curve graph back to default by left double-clicking on the graph
- density display (if enabled in Prefs): hold down Control button and move cursor over image to see density information
- move the crop box with the mouse by holding the shift key while dragging the crop box or by dragging the center of the crop box
- zoom in or out by using the mouse wheel
- select a frame in a multi frame scan by clicking on it
For future releases I hope VueScan will incorporate right-click menu functionality. I think the program would be much easier to use if the user could right click on the graph or the preview and find the most commonly used commands right there.
Only very frequent users of the program will remember the above shortcuts since some of them are not exactly intuitive. They are also not easily found in the documentation. This leads us to our next topic, which is:
HELP, DOCUMENTATION, AND SUPPORTPressing F1 brings up the Release Notes in your web browser, which contain a Quick Start Guide and a link to an
Online User's Guide. The Release Notes also contain a detailed section about the supported scanners and operating systems plus a version changelog and instructions about removing VueScan. The latter is important, since VueScan does not come with an uninstall program. It is uninstalled by simply deleting the program folder.
There is also a manual on the website which I downloaded and used in my first attempts to become familiar with the program. After a few hours of work which did not give me the desired results I noticed that the manual was outdated. The
Online User's Guide however seems to be current most of the time.
It is divided into six sections:
- Getting Started
- Common Tasks
- Quick Settings
- Hints and Tips
- APPENDIX A: Advanced Tools and Techniques
- APPENDIX B: Buttons, Menus and Options Reference
The first two sections are very well written and lucid and contain many screenshots which are very valuable in understanding the text. The last four chapters are not that rich in visual aids, except some subsections in Advanced Tools and Techniques.
The User's Guide is largely cross referenced with links, but not consistently. A few parts are not cross linked and just mention where to go to obtain the information. The Options Reference part is most important for the advanced user, yet here you find almost no explanatory visual aids. More examples and advice would be desirable. At many points the User's Guide seems too brief.
With a few days of Ed Hamricks attention, the manual could become a much more valuable tool to help the novice as well as experienced user gain a clearer insight into the workings of the software. It would then make the interaction with the program much more enjoyable and rewarding. An overhaul would certainly make VueScan easier to use and attract many more users while at the same time reduce support requests.
Attentively reading the manual is a must for learning the expert functions of VueScan. I have defined a browser session for the Online Help consisting of tabs for Appendix A, all the six option pages, and the Menu page. When I need help, I open this session, position VueScan to the far left of my screen, and the browser window so that it overlaps the Preview area, but not the options area of VueScan. This way I can read the help while at the same time looking at my available option.
Since VueScan's GUI is compiled in
wxWidgets for three different operating systems it is understandable that the regular F1 Windows help is not provided. A separate help tab in the image pane behind the Scan and Preview tabs showing help for the currently selected options tab would be a great addition. VueScan options are dynamic: they appear or disappear depending on the selections made as well as scanner capabilities. Since all options are briefly explained in the manual whether they are shown or not, this can potentially confuse the user. Therefore the proposed help pane would be most useful if it can dynamically adjusted itself to show only the visible options. Such a proposed help system should be cross operating system compatible.
Another possibility would be a context based help system, with detailed help only for the section the mouse hovers over sharing space with the graph window at the bottom of the screen. The user should be able to turn this help off and when the histogram is displayed, this help would be hidden by the the graph window. This system is implemented by FocalBlade, which we will discuss in another part of this review, and it is very effective.
The program also has brief balloon hints for every option as well as an explanatory line in the status bar for every menu item.
Should there be any difficulties scanning, restarting the computer and scanner plus setting File>Default Options will solve most issues. If not, Ed Hamrick provides support and answers questions personally via e-mail with a normal turnaround of less than 24 hours on weekdays. It is important that when users ask for support they include the vuescan.log file (can be turned on and off by checking Output>Log file) and a step by step procedure helping Ed how to duplicate the problem beginning with an option reset through File>Default Options. A majority of Ed's time is taken up by requesting this log file and asking how to reproduce the problem.
A bulletin board as we have at DonationCoder using free forum software SMF or MyBB could probably help Ed manage his support requests even better. Building a great user community where many tips, sample ini file configurations, and tutorials written by other users would be available and experienced users would help novices could well free him even more time for development. Users would be able to access a wealth of tips and tricks form Ed and other advanced users helping them with their scanning which can be a daunting task for an inexperienced user with many very subjective elements and judgments of picture quality involved. Support by E-mail largely means answering the same questions over and over again, which in a forum situation would occur much less since they have been answered before and are available via the search function. The most important and frequently occurring problems could even be made sticky at the top of the forum. Hitting the reply button in a forum should be just as quick as replying to an e-mail. However, of course, one must respect Ed Hamrick's decisions how to run his business how he likes it. Therefore, this suggestions as well as all other points made in this review should not be taken as criticism of the software, but merely as ideas how to make a really fine product even better from the reviewer's perspective. I mean after all Ed does want to keep busy for the next few years, doesn't he
?
DOCUMENT AND BOOK SCANNINGVueScan has many well thought out features for dealing with single or even multi hundred pages scan jobs.
One of the most outstanding is the Auto Repeat facility, which allows for scanning many pages one after the other without pressing any additional buttons. It can be set to scan continuously or to a set repeat delay between scans of a few seconds (for book scanning) or even hours (f.e. for automatically documenting cell growth in lab research). Often continuous mode is appropriate since the next page can be inserted while the scanner sledge returns and allows scanning at the maximum speed a scanner is capable of. In my test using the Plustek OpticBook 3600 scanner I was able to reliably scan at 12 seconds per page using this facility. To interrupt the scan change Auto Repeat to none.
All rotating options (left, right, flip, mirror) are available. Lacking is merely a facility to rotate only odd or even pages, which would be helpful for single page book scanning where the book has to be turned 180 degree for every page (as is the case for the popular Plustek OpticBook line of specialized book scanners).
The Multi Page checkbox is important, since it adds the otherwise invisible Page menu to the menu bar, which allows more ways you can imagine to sort and manipulate the scanned pages (f.e. interleave, swap, separate, reverse, delete, make first etc. etc.).
What is missing is a multi thumbnail ribbon vertically between options and image panes as a visual aid for checking crops etc. and for dragging and dropping pages in different sequence plus right click functionalities on the thumbnails.
Autoskew and automatic cropping work best with photo scanning yet not very reliably with text (see towards the end of this post for some free alternatives), but there is a manual deskewing and well implemented cropping by mouse available. Also absent is an automatic dewarping which would be useful to correct bent text along the spine of a book. Automatic correction to adjust for bleed through from back side text on thin pages is also missing, but this can be done manually in the Color options. A gutter shadow correction is also absent.
Since I have tested VueScan for several months I witnessed Ed's polishing of the OCR feature almost in real-time. When I began testing I could not use OCR on some foreign language texts, because the OCR module crashed regularly. To VueScan's defense this was the only time (except for right now where I am doing some special testing for Ed with 9600dpi scans on my new CanoScan 9000F) I experienced crashes. A few weeks later Ed fixed it.
One of the main things I was going to suggest is searchable PDF files, since Vuescan was only able to save the OCRed text to a separate unformatted text file. But wouldn't you know it, he added this feature (without me suggesting it to him) at the end of May in version 8.6.32. In its first incarnation VueScan hung itself up while adding the OCR layer to the PDF, but then he re-released 8.6.32 and it worked great ever since. You can view the document's scan while at the same time searching a layer of underlying text characters and your PDF viewer will accurately stop at the very point where the characters are shown in the scan -- it is real magic! Works well even if the document uses columns and contains graphics.
VueScan uses the open source OCR
Tesseract pre-release version 3 developed by Google/HP and includes support for English out of the cradle. Another 32 languages including Chinese are supported by downloading special language files from
http://www.hamrick.com/ocr.html.
I did extensive testing on the OCR module and can say that it is even better than the searchable PDFs Canon's excellent ScanGear software produces, definitely has better accuracy than the free
TopOCR program (using TopOCRs standard settings, with tweaking TopOCR gets better), but is obviously far away from the superb top of the line
Abbyy Finereader Pro -- which is of course expected. Tesseract does even pretty good recognition if the text is slightly skewed. If you scan in 1 bit black and white text mode, the accuracy depends a lot upon a well adjusted threshold setting in the Color tab. This setting tells VueScan at which threshold a pixel is regarded as being white or black and can change quite a bit from document to document because the inks blackness varies. Best way to adjust it is to zoom into the text and change it until you get nicely shaped black letters without any surrounding extra black speckles. VueScan uses a default setting of 0.5 but I find the best results for most texts is between 0.59-0.69, though it really depends upon the blackness of the ink used. Accuracy depends a lot on resolution too, Tesseract doesn't do as well for resolutions below 400dpi. The sweet spot seems to be in the 400-600 dpi range depending on font site, i.e. small fonts need more towards 600 dpi, large fonts 400 dpi or even lower for very large letters.
VueScan has many different output options available for PDF, OCR, JPG, RAW, DNG, and TIF. The detailed options are visible only when the corresponding format box is checked. The missing PNG format is not important, since one can easily and losslessly convert TIF into PNG using f.e. IrfanView.
 Some choices in VueScan's Output Options tab (Yes - there are more ... )
BTW the scan proves that "New Age" started in the 70s - that's when the document was printed VueScan has very powerful file naming and automatic scanning facilities. One can use sequential and/or time/date based auto naming. Scans can be saved at the same time in different formats and even in different resolutions, bit size and each with its distinct naming template.
VueScan can save you a great amount of time by scanning to one multipage PDF while simultaneously also saving unique single page files as Raw, TIFF or Jpg.
Let's say you want to scan a 100 page book for archiving in one hundred 300dpi grayscale single page files named sequentially "Doc-time-date-sequential#.tif" and simultaneously as one searchable multipage e-book "MyEbook-time-date.pdf" in 1 bit b/w 150dpi high compression PDF. No sweat - once setup VueScan will do that with one mouse click in a one pass scan.
Let's walk through this example so that you can gain some familiarity with the more advanced document scanning options. If you have already done some work with VueScan and found a setup that works for you, please select File>Save Options and store your settings with a descriptive name so you can easily reuse them later. Then select File>Default Options (in the menu, not the options tabs) to begin with a fresh setup. Now click on the "Advanced" and "More" buttons at the bottom. If you have several scanners connected, select the scanner you want to use in Input>Source. If that scanner can scan slide and film as well as paper, the Mode option will be available - set this to "Flatbed". Set the Media option to either Newspaper (if your scanning material is a Newspaper or Magazine) or to B/W color (if it is a book with line art graphics).
Reflective Media Options - which one to choose?
In any scanner driver you can specify which media you have put on the scanner glass - one of the most important options for a successful scan. In VueScan this is one of the most top level selections which influences many other settings assumed by the software. So what are the different reflective media types and their characteristics?
One can separate the options into two groups: color and black and white/grayscale. Let's make an overview of VueScan's possibilities:
| Color (max.Bits) | B/W Gray (max.Bits) | | Color photo (48 bits) | B/W photo (16 bits) | | Magazine (24 bits) | Newspaper (8 bits) | | Line Art (3 bits) | Text (1 bit) |
Printing presses use a raster pattern of dots of black, cyan, magenta, and yellow to display color gradations. These dots are seen if one looks at a magazine with a loupe. With the magnification effect of scanning this raster becomes visible as moiree. VueScan applies a decreen mask to the Magazine and Newspaper settings automatically which blurs the dots so that the raster pattern is less visible.
Line Art consists of lines of solid colors without color gradations in the line. Text consists of black lines only.
Please note that nothing is set in stone and you have some choices: In our example we want to generate grayscale as well as black and white output - that's the reason we want to scan f.e. magazine media with Newspaper settings or a book containing colored line art with B/W photo. But if we were to scan the book as Text, we could not obtain grayscale output.
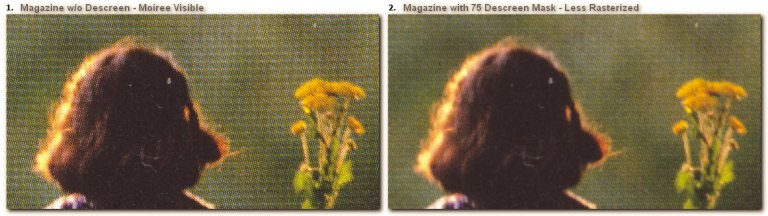
Left: Magazine scanned as Color Photo with visible Moiree; Right: Scanned as Magazine with Descreen
|
Now follow these steps (the PDF file will pop up in your default PDF viewer, since we will keep Prefs>External editor checked):
- click Preview or press Ctrl-I
- then select the right page size by cropping with your mouse
- check Input>Multi page (this will make the "Page" menu appear)
- set Input>Scan resolution to 300dpi,
- check Output>TIFF file,
- enter "Doc-HH.II-YYYYMMDD-001+.tif" as file name (preface an optional path for not saving to the Output>"Default folder"),
- uncheck "TIFF multi page" for getting single page files,
- file type to "8 bit gray".
- Then check Output>PDF file,
- enter "MyEbook-HHhIIm- YYYY.MM.DD.pdf" in Output>File name,
- enter "2" in "PDF size reduction" for the 150dpi downscaling,
- check "PDF multi page"
- "1 bit B/W" in "PDF file type",
- "PDF compression" to Maximum (not recommended for best quality, just for sake of this example),
- check "PDF OCR text" and choose correct "OCR text language"
- uncheck Prefs>External viewer if you do not want your TIFF viewer to pop-up 100 times when done
- for automatic scanning set Input>Auto repeat to continuous or a comfortable time interval and if shown check "Lock image color"
- click "Scan" once (or press Ctrl-N once) and do your 100 scans by simply turning the pages - no other manual intervention necessary
- during the last page scan change "Auto repeat" to "None" (do NOT touch the "Abort" or "Last page" buttons!) to finish automatic scanning
- use the "Page" menu to review, sort and correct (f.e. deleting a bad scan and replacing it with a new image by pressing "Scan" or using the mouse to change the crop frame for individual pages where content is cut) the 100 images - navigate to single pages by entering the number in Input>Frame number
- click the "Save image to file" button or press Ctrl-S to save the files output
- check the file output (100 single page TIFF files and one PDF searchable E-book containing 100 pages) with your favorite viewer
- if not satisfied with the file output make any changes (f.e. lower resolution, lower bit file type, different compression, different OCR, file names or other Output, Crop, Filter, or Color options) to the VueScan settings without! the need for a rescan
- click the "Save image to file" button (or press Ctrl-S) to preview the files to be created again or click "Last page" button to finish everything.
In VueScan you can always make changes to the setup after having scanned everything (but
before clicking "Last page" in a multi page situation) and then simply click the "Save image to file" button with the 90s style floppy disk icon (when will we finally replace these floppy things with USB stick icons

?) to save the changed files without rescanning.
The time(HHIISS)/date(YYYYMMDD) placeholders in file names only work, when Prefs>"Substitute date" is checked - which is on by default - and at least three of them are used in the name, f.e. "Scan MMYYYY.tif" will not substitute, but either "Scan HH.II-SummerVacation YYYY.tif" or "Scan HH.II.SS.tif" will work. This can be a great convenience.
Scanning a book with VueScan directly to a searchable PDF is one easy method of turning your physical books into e-books. If you want to go that route, I suggest scanning in 600dpi b/w or grayscale. You can scan in 300dpi grayscale too but keep in mind that OCR accuracy will suffer and screens are getting bigger and bigger and what looks good today on a small screen may look awkward on a 50inch screen a few years from now.
If you want more professional results, it is better to go for this several step process:
- scan your book at 300 dpi grayscale and save them as TIFF files with auto-numbering (select Output>"Auto file name" and put f.e. 001+.tif in Output>"TIFF file name")
- upsample the TIFF files from 300dpi grayscale to 600dpi 1bit b/w using f.e. IrfanView (Note: VueScan has great downsampling abilities but cannot yet upsample.)
- post process the files (see software recommendations below to rotate/deskew/crop/dewarp/[back-]light correction etc.) or do it in Abbyy Finereader Pro
- run a stand-alone OCR program like Abbyy Finereader Pro
- output to searchable PDF or searchable DjVu format
- add bookmarks to the PDF (see software recommendations below)
- harmonize page numbering with the physical book (see software recommendations below)
The upsampling concept may be confusing to some but I can confirm its effectiveness: The 300dpi grayscale scan is faster than a 600dpi b/w scan would be, yet it contains more information (8bit vs. 1bit). Upsampling to 600dpi b/w therefore does not give you a deterioration in quality as would upsampling from 300dpi b/w to 600dpi b/w. Yet when you view the text in big letters on an HD monitor you can see that the 600dpi b/w text looks much nicer than 300dpi grayscale or b/w would (at this larger size). So the font will look good, the scan will process fast, and the file size will be small too. It is really an ingenious concept which has mainly been developed in Russia. Supposedly all works published in the former Soviet Union before 1974 are free of any copyright restrictions. This is one reason a large e-book community exists in Russia.
Interestingly the Russians like storing e-books in open format
DjVu files developed by AT&T. It is superior in quality/file-size to PDF and allows OCRed text in a searchable layer but hasn't been promoted very well in the West. Recently though I went to the site of a major company and noticed that they have all documents available in DjVu as well as PDF. So it looks like the world is waking up to this better format. If Ed would like to extend VueScan's file savings capabilities, my favorite candidates would be DjVu and Jpg2000.
When setting up your book scanning project, first find a couple of pages in the book that have the largest area covered with print. Now put this page on your scanner and make a sample scan. Now adjust the area to be scanned in the Crop options or via the mouse to include all the printed area. Don't forget that some books have illustrations in the margins. An e-book looks really ugly if the width of the pages changes. Therefore leave yourself enough room for error and deviations in book placement, when you are scanning at full speed. But make sure that the crop frame will not be larger than the area covered by the book. This will let you scan with your scanner lid open or completely removed for speed and less physical fatigue and help you avoid ugly black areas in your scan too. If your eyes get irritated by the bright scanner lights, wear a pair of cool sunglasses.
Make sure you only exert as much pressure as needed on the book to keep it as flat as possible, because:
- you do not want to damage the book
- you want to be extra careful not to hamper the precision scanning mechanism by pressing the platen down too much on the carriage
- you want to prevent muscle exertion when scanning a few hundred pages in one session
The manual of the CanoScan 9000F advises not to "press on the document with a force exceeding 4.4lbs (2.0 kg). If you press heavily, the scanner may not work correctly or you might break the glass." But this scanner is built very sturdily. Others, f.e. portable CMOS scanners, can endure much less pressure.
Some scanners (like the OpticBook line form Plustek) have a special edge setup so that a single book page can be put on the platen without exerting pressure on the spine, which is of course the easiest on books and the operator as well.
When setting even my OpticBook on my desk, book scanning always gave me sore shoulders. However, putting it on a stool in front of me in line with my posterior so that I did not have to raise my shoulders or tense my arms made a world of difference and the effort completely painless.
It will be much easier to follow your scanning progress and do any post processing if your file numbers match your actual book page numbers. Some books have introductions with separate page numbering. In this case I scan them first and in the Output file name options enter f.e. "Intro 01+.tif" if I scan every page to a unique file. When I do the main part I start again by entering f.e. "001+.tif". Later the page numbering in the PDF can be changed to match the original with
BeCyPDFMetaEdit.
I attempted to coax VueScan into scanning a book laid flat on the platen and separating its two pages in one pass and then auto-repeat while I turn the book pages. VueScan can do the scanning and separating part using its batch and multi-crop facility but unfortunately when batch scanning auto-repeat is not available. It would be a great efficiency enhancement if Ed could change this in a future version. However auto-repeat does work of course when one scans a page at a time. We can use some mighty helper applications to assemble an e-book which we now have on our hard drives in the form of individually numbered page files thanks to VueScan.
The free compiled AutoHotKey based program
Multi-Rename Script was modeled after
Total Commander's excellent multi rename facility and even improved on it but works stand alone. It will be a great help, if any renumbering or renaming of page images is needed for an e-book project.
The free document scan post processing software
ScanTailor (
User Guide) and
ScanKromsator (
unofficial documentation) superbly complement VueScan with rotate, deskew, crop, dewarp, split pages, and more features. ScanTailor works only on the entire batch, while ScanKromsator is the more powerful one and can work on single images but its documentation is sparse.
 Scantailor and ScanKromsator - excellent VueScan helper applications - From Russia with Love ...
Both providing great batch book page separation, despeckle, deskew, rotate, and optimization of page sizes and marginsFurthermore,
Abbyy Finereader Pro (
test version available) is a complete e-book publishing software by itself, containing comparable functionalities as the above and is also one of the best all around OCR applications available. It can output in PDF as well as in DjVu, though check if there still is a known limitation, which confuses your underlying OCR layer if you manually correct the recognized text when using DjVu as output (DjVu only, always worked fine with PDF).
With
BeCyPDFMetaEdit or java based
jPDF you can add a professional touch to your finished PDF e-book by adding bookmarks and number the e-book exactly like the original, f.e. roman numbers for the preface, arabic numbers for the main text - so that you can enter a page number directly into the application (like the excellent free
PDF Xchange Viewer with direct PDF editing capability), and go to the exact corresponding page in the book. While the page numbering synch between scanned e-book and real book is definitely not necessary for a work of fiction, it is absolutely essential for any non-fiction, scientific or reference book where the reader needs to navigate via the table of content or backtrack from the index. The first two applications above can also reorder, rotate or delete pages, sign, watermark, combine, or encrypt PDFs.
For those interested more in book scanning this
PDF tutorial will give you additional in-depth information. You may also find this site on
photographing books using digital cameras for copying books of interest.
Document scanning is the easiest scanning discipline, because generally speaking color adjustments and high resolution scans do not play such an important role. You put a piece of paper or a book on the scanner, press a button or click with your favorite rodent, and today's scanners reliably convert it into a digital image. Since fax machines began to make their inroads in the business community in the 80s, this technology has been well understood. Therefore we chose this topic for the first step of this scanning discussion to introduce VueScan's features.
In the following parts of this DonationCoder series on "Scanning: VueScan and Associates" we will go into much more detail on high resolution color scans. But before we can delve into this more complex subject, we need to get ready for it by building a foundation on some more fundamental issues that need to be set so that VueScan in combination with your scanner can easily deliver high quality color scans.
Therefore, Part II of this series - to be published soon - will discuss some hardware related topics pertaining to VueScan's color management, profiling, and raw scanning abilities plus more hints and tips and more great software that complements VueScan. (C) Copyright 2010 Brahman

