Here's something that might make it easier: gmMontage
It's a simple program that will generate a batch script to be used with the
GraphicsMagick program, (that means you need to install GraphicsMagick).
New v0.0.0.3:
Modified GUI
A few more colour choices for the separator
Generates the batch to call GM, just double-click it
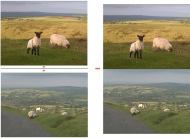
Can generate Horizontal or Vertical GM batch file, so for the OP, run it first as Vertical, then run it as Horizontal on the resultant images from the Vertical run, and you'll get:
AC
BD
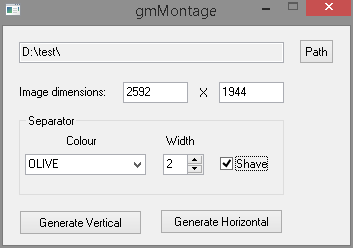
Use the
Path button to select an image in the folder you want to process, if Windows can read the image file the Width and Height values will be filled in along with the Path automatically. You can enter the Width and Height manually if necessary, (eg. Windows can't read the info from the file) -
any values you enter will be overwritten if you then choose another file.
Select a separator colour from the drop down list, (I can add more if necessary), set the separator width. The
Shave checkbox lets you remove the borders that get added at the top/bottom or left/right of the final image.
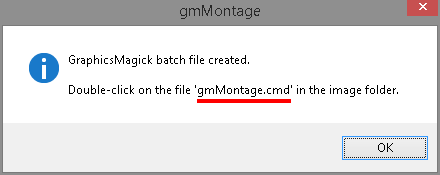
After it's finished you'll get the following window:
 NOTES:
1) It outputs a PNG file, the file will be named
<image1>+<image2>.png. Thus the output is lossless but will result in larger file sizes - you can always recompress as JPG to a level that's acceptable.
2) If there's an odd number of images in the folder, the last one won't be used.
3)
This was written with the constraints of the OP in mind, ie. images are all the same dimensions, orientation, and vertical/horizontal appending of two images was required.With any luck after executing the batch file you'll get the following result:
 IDEA: Image Append - Batch
Here's the source, executable attached:
#Region ;**** Directives created by AutoIt3Wrapper_GUI ****
#AutoIt3Wrapper_Res_Fileversion=0.0.0.3
#EndRegion ;**** Directives created by AutoIt3Wrapper_GUI ****
#include <File.au3>
#include <FileConstants.au3>
#include <MsgBoxConstants.au3>
#include <GDIPlus.au3>
#include <ButtonConstants.au3>
#include <ComboConstants.au3>
#include <EditConstants.au3>
#include <GUIConstantsEx.au3>
#include <StaticConstants.au3>
#include <WindowsConstants.au3>
_GUISetup()
_Main()
_Exit()
#Region ### START Koda GUI section ### Form=d:\docs\autoit\_coding snacks\gmmontage\gmmontage.kxf
$Form1 = GUICreate("gmMontage", 347, 219, 335, 196) GUICtrlSetTip(-1, "Select an image file in the folder to process") GUICtrlSetTip(-1, "Generate batch file for GraphicsMagick (Append Vertical)") GUICtrlSetTip(-1, "Generate batch file for GraphicsMagick (Append Horizontal)") GUICtrlSetData(-1, "WHITE|YELLOW|GREEN|OLIVE|BLUE|DARKBLUE|GRAY42|ORANGE|RED") GUICtrlSetTip(-1, "Pixel width of separator line," & @CRLF & "line will be DOUBLE this value." & @CRLF & "Max value: 20") #EndRegion ### END Koda GUI section ###
Local $sTemp = FileOpenDialog("gmMontage", "", "All (*.*)", $FD_FILEMUSTEXIST + $FD_PATHMUSTEXIST) If $iWidth = 0 Or $iHeight = 0 Or $sSrce = "" Then MsgBox($MB_ICONERROR, "gmMontage", "Check PATH, WIDTH or HEIGHT values")
Local $sOutfile = $sSrce & "gmBatch-V.txt" $sGeometry = "2x1"
$sOutfile = "gmBatch-H.txt"
Local $sTempFile = $sSrce & "gmMontage.txt" Local $DOScmd = "dir /b /on *" & $sExt & " > " & $sTempFile Local $aFiles = FileReadToArray
($sTempFile)
$iCount -= 1
Local $sBatch = "montage -tile " & $sGeometry & " -background " & $sColour & " -geometry " & $iWidth & "x" & $iHeight $sBatch &= "+" & $iSep & "+0 " & $aFiles[$i] & " " & $aFiles[$i + 1]
$sBatch &= "+0+" & $iSep & " " & $aFiles[$i] & " " & $aFiles[$i + 1]
$sBatch &= " temp.bmp" & @CRLF & "convert -shave " & $iSep & "x0 temp.bmp " & $sOutname $sBatch &= " temp.bmp" & @CRLF & "convert -shave 0x" & $iSep & " temp.bmp " & $sOutname $sBatch &= " " & $sOutname
$hFile = FileOpen($sSrce & "gmMontage.cmd", $FO_OVERWRITE) "gm batch -echo on -feedback on " & $sOutfile & @CRLF & _
"del temp.bmp")
MsgBox($MB_OK + $MB_ICONINFORMATION, "gmMontage", "GraphicsMagick batch file created." & @CRLF & @CRLF & _
"Double-click on the file 'gmMontage.cmd' in the image folder.")
_GDIPlus_Startup()
Local $hImage = _GDIPlus_ImageLoadFromFile($sTemp) Return _GDIPlus_ImageGetWidth($hImage) Return _GDIPlus_ImageGetHeight($hImage) _GDIPlus_ImageDispose($hImage)
_GDIPlus_Shutdown()

